UPDATE SEPTEMBER 2024: this article is obsolete. I now edit with DaVinci Resolve, shoot in 4K and 30 FPS.
When I go on holidays or do sports, I usually film with three different devices:
- My smartphone
- A GoPro
- An Insta360 One X2
Then, I like to make video montages. But because it usually does not happen more than twice a year, I regularly forget how to make a great movie. So this article acts as a reminder for myself. I thought it could be useful to other people too, that's why I put it online.
Overall process
- Record in 1080p, at 25FPS, unless you want to go fancy and do 100 FPS (for decent slow-mo) and/or 4k. Why 25 and not 24 or 30? Because 24 is not always 24, sometimes it's actually 23.976, and 30 is sometimes 29.97, depending on the camera you are using. You're never so sure. 30FPS on the GoPro is 29.97, but 30FPS on the Insta360 One X2 gives 30 when exported from the mobile app, 29.97 from the desktop app. While 25 is always 25, on any camera, any software. (update september 2024: I now record in 30fps on all my devices)
- Download Kdenlive for the video montage.
-
Extract regular videos out of 360 videos using the desktop application (Insta360 STUDIO) from Insta360, not the mobile one, as you get better quality. Export with the following settings:
- Disable "Lock Direction"
- When doing slow-motion: disable "Motion blur"
- I find the "Optical Flow stitching" better than "Dynamic Stitching", so I always keep this one on
- "Chromatic Calibration" always on
- 25FPS when exporting (update september 2024: 30FPS)
- 25Mbps when exporting
- HEVC (H265) when exporting
- update september 2024: check Dolby Vision, to export in Rec.2020 HLG, otherwise you'll get Rec.709
Careful, after exporting, the first frame (or first 2 frames) might not match the angle/level of zoom you picked. Remove these frames in Kdenlive when importing, if necessary.
-
You can overlay GPS data (from a Garmin device for instance) on top of a video to show nice stats such as the speed, the altitude, etc. To do so, refer to this article that I wrote
- Using VLC,
Tools>Codec information, check the framerate. All videos must have the same frame rate otherwise you might encounter issues in Kdenlive (Kdenlive will usually reencode your input video if the framerate is variable for instance). - When creating a new project in Kdenlive, make sure to use the very same frame rate and frame size as the input videos, so in my case 25FPS and 1080p. Pick BT.709 as the color range, or best BT.2020 if available. FPS, frame size, color range, all of that can be changed later in
Project>Project Settingsbut it is not advised as it will shift clips randomly for example when changing the FPS (I experienced it). - In Kdenlive settings, under
Playback, make sure GPU acceleration is disabled, cause it's buggy. Also enableProxy clipsfor videos larger than 1000 pixels. -
You probably want to import your video clips in a chronological order. Here is how to rename videos to match their creation date:
# Insta360 videos $ for f in *.mp4; do mv -n "$f" $(echo "$f" | cut -c 5-19).mp4; done renamed 'VID_20230708_154459_00_001.mp4' -> '20230708_154459.mp4' # GoPro videos and smartphone photos $ for f in *.MP4; do mv -n "$f" $(exiftool -T -createdate -d "%Y%m%d_%H%M%S" "$f").MP4; done renamed 'GX010697.MP4' -> '20230709_091946.MP4' -
Remove the audio track from clips after importing them in Kdenlive, where audio does not matter. Or lower the volume by some decibels.
- You can "lock" audio or video tracks, when you absolutely do not want to misclick and inadvertently move clips.
- When rendering, export in HEVC (smaller file size than H264). In the end, Youtube will re-encode any uploaded video to further cut down its size, and the visual quality will be more or less the same. Exporting in VP9 results in a file slightly bigger than HEVC, with the same quality. AV1 is supposedly the shit, better quality and smaller. Yet, in 2021, Kdenlive shows it but I cannot select it, it's grayed out. So I recommend HEVC, with the second slowest encoder speed (
preset=slower), and keep the default quality setting, don't tick "Custom Quality" (keepcrf=28). However, if the video is short enough and you can afford the extra rendering time, you should go for the "slowest" preset. It will take longer but the overall quality will be better. Also, if the video is short, you may go for a custom quality. I find 75% (crf=23) very good, without increasing the file size too much. Lastly, use 4 threads but do not use parallel processing, as it is still experimental and not stable enough (in 2024 at least).
Transitions, songs, music sync and beats per minute
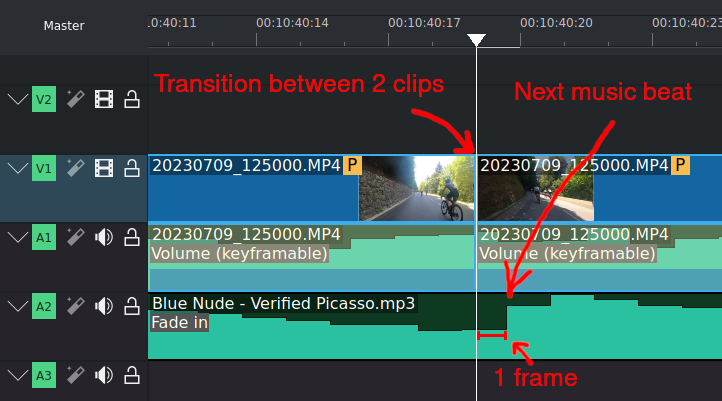
I like to sync the audio track with the video, so I try my best to change scenes on the beat. Also, I very often correct the volume of the audio tracks (usually reducing the songs' volume and increasing the original sound from the videos), through the built-in "Volume (keyframable)" effect.
For transitions, I recommend that the new clip starts one or 2 frames before the next music beat, because of the persistence of vision. I read on Reddit that the human eye takes 1/10th of a second to process images, while sound is near instant. 1/10th of a second, with 25FPS, would mean 2 frames.
Do not forget that Kdenlive does not use milliseconds but instead a number of frames. That should be helpful when resizing clips. Say you have a song at 100 beats per minutes and you want 4-beat clips at 25 fps. Do: 4*60/100 = 2.4. Then, do the math again for .4 to use a scale from 0 to 25 instead of 100: 0.4*25=10 frames. Which gives you clips that last 00:00:02 seconds and 10 frames, Kdenlive-wise.
To find the BPM of a song, use any of the following links:
- Tap BPM - Online Beats Per Minute Calculator and Counter
- MP3 to BPM (Song Analyser)
- Find the BPM for any song | Type a song, get a BPM | Every tempo | songbpm
Beats calculator
Fancy effects in Kdenlive
Fade-in/out
There's a built-in effect for that. Make sure to tick "fade to/from dark".
Split screen
Iris out
Rewind video (VHS style)
Text reveal behind an object
Blend a video with a solid color
Cinematoscope aspect ratio
Old film
Use the "Old film" effect.
How to place a video inside text
That's about it!