UPDATE 2024: after dreaming about it for about a year, the V2 of this project finally came to be. Scroll all the way down to read about it!
I got really tired of turning the crank of my IKEA Starska standing desk multiple times a day. Not only this is tedious, but also I can't keep on typing or using my mouse while doing so. And if I'm in a meeting, I look stupid. So I decided to motorize it. I know IKEA already sells an electrical version of it with a motor, but it's 200 euros more expensive and I already had one desk. Plus I like challenges!
After hours of googling and reading various blog posts (see the bottom of this page for links), after days spent waiting for all my orders to arrive, after minutes of tinkering, I finally got a working prototype!
That's far from perfect, I already have ideas about how to improve it, but for now that'll do... Down below is the shopping list for this project and the steps to build it. I hope this helps!
Hardware
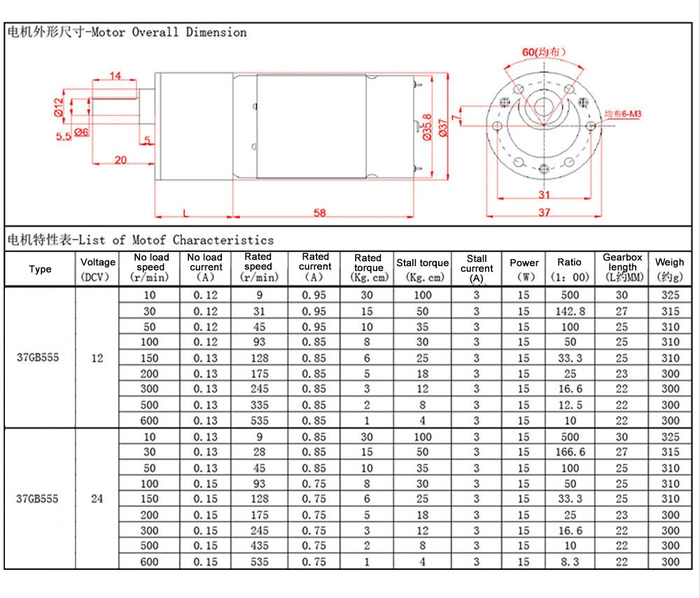
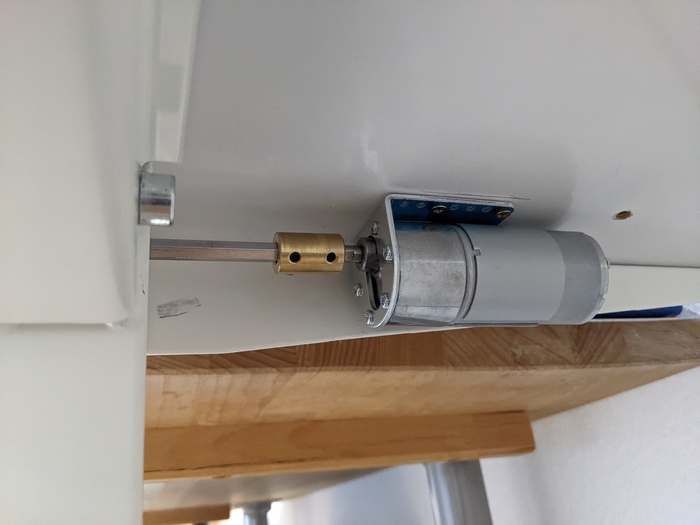
DC 12V Gear Motor (37D mm)
- Not just a regular DC motor. See the difference between a regular DC motor and a DC gear motor
- The diameter must be 37 mm, so that it fits perfectly under the IKEA Starska standing desk
- Torque must be equal to or greater than 2Nm (20.4 kg.cm) (info found here). Look at the stall torque, not the rated torque.
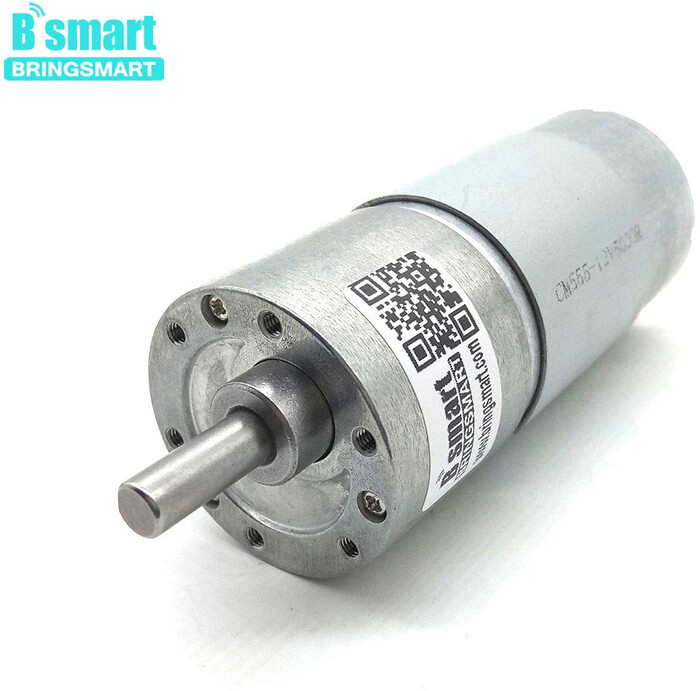
I bought and tried these 2, the 12V 72 RPM edition, that draws 3 amps ("stall current"), and the 12V 136 RPM one. According to the specs of the 72 RPM one, the stall torque is greater than 30 Kg.cm and it works perfectly! I can put weight on the desk (I tried more than 30 Kg) and it still raises the desk up easily! As to the 136 RPM, it works well too, up to 30 Kg, but it gets real close to stalling. Without much weight (a laptop and a monitor), it raises the desk at about 100 rotations per minute.
9.36 euros
Alternatively, this other motor looks like a viable option too.
Aluminum L-Bracket for 37D Metal Gearmotors
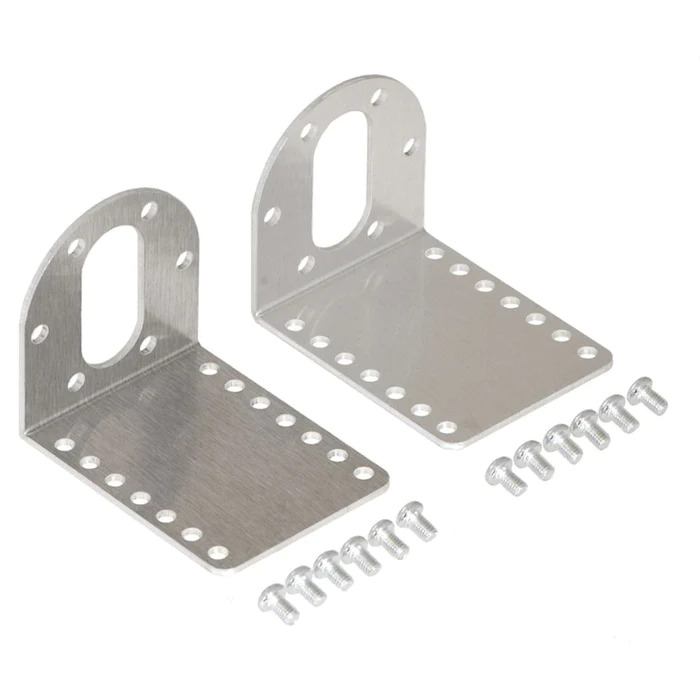
We will use this to secure the motor to the desk. I got it from The PiHut. £8.25
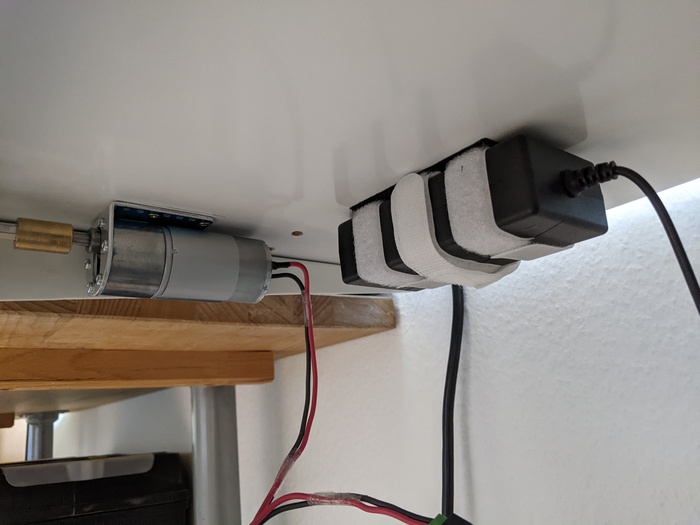
Power adapter INPUT AC 110-240V / OUTPUT DC 12V 5A
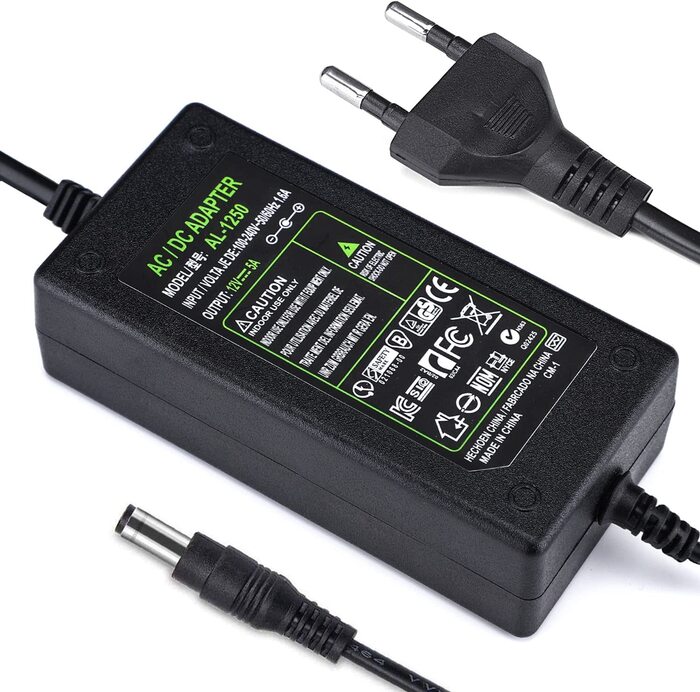
I got this one from Amazon, works like a charm! 14.99 euros.
6mm hex key
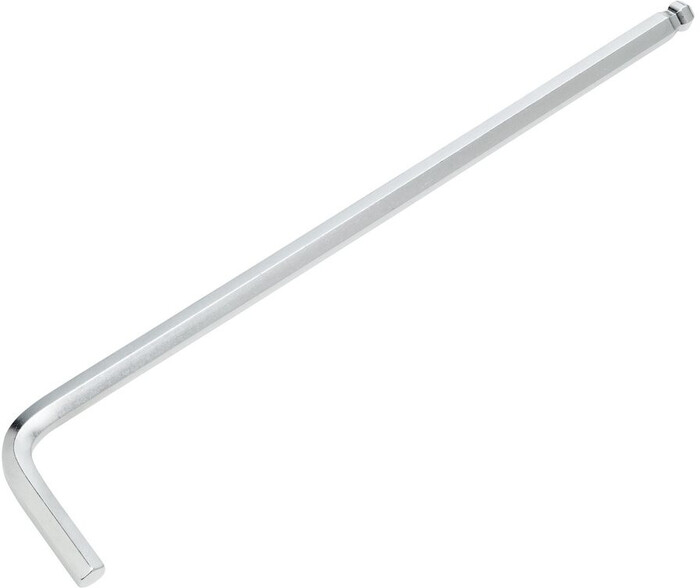
I got this one Obi.de and I had to cut off the bent part of it. This will replace the original crank provided with the desk. 4.49 euros.
7mm shaft coupler
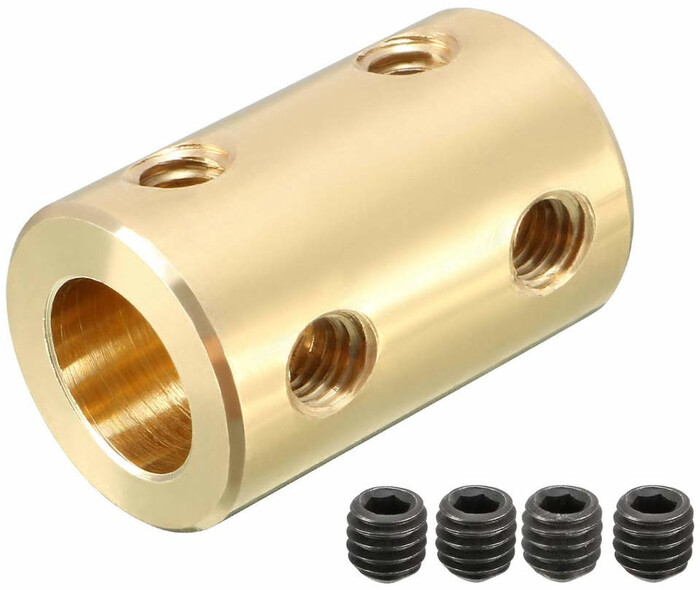
This will connect the motor to the hex key in the desk. Get a 7mm shaft coupler, since the motor comes with a 6mm D-shaped shaft. The hex shaft for the desk is 6mm too, so the shaft coupler must be 1mm larger. 8.27 euros.
DC motor driver
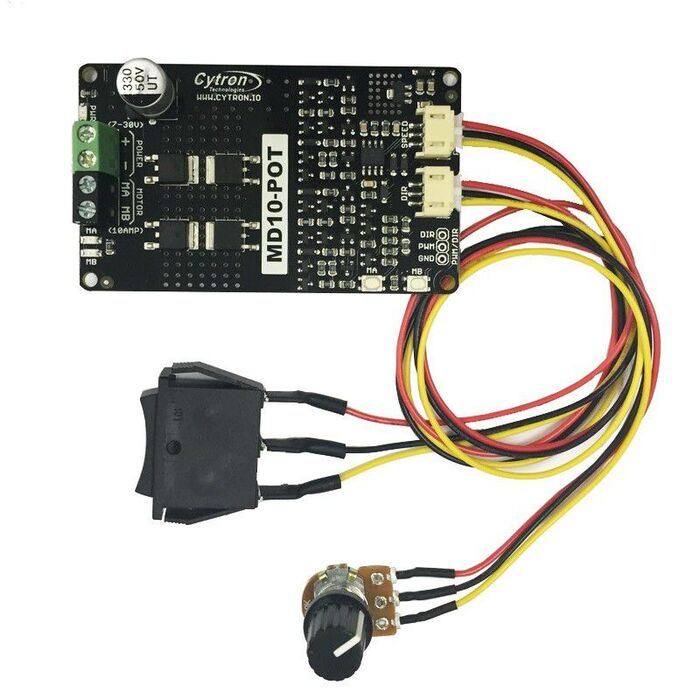
This will control the motor. I went with the MD10-POT from Cytron, that comes with a potentiometer (adjust speed) and switch (2 directions and stop), and that does not require any Arduino nor any code writing.
Careful: this is a regenerative motor driver (as described at the bottom here), meaning that when you stop powering the motor, it keeps spinning a bit before coming to a stop (due to inertia, while it's "braking"), and as a result the current flows back to the power source. As a consequence this driver should be used with a battery, not a switching power supply, because a battery can be charged but with a switching power supply the current has nowhere to go. For this project it is ok though as the desk is heavy and won't allow the motor to keep spinning when the power is cut.
Learn more about controlling a DC motor here.
I bought mine on Botland.de. 12.48 euros.
DC Connector Barrel Plug Adapter 2.5mm x 5.5mm
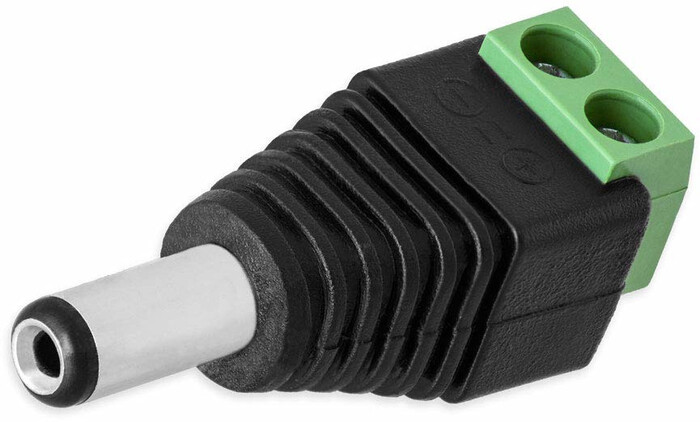
This is used to connect the DC power supply with the motor driver, I got two from Amazon. 4.99 euros.
Misc
- Duct tape
- A grinder, to cut off the bent part of the hex key
- Electrical wire
How to build it
- Cut off the bent part of the hex key with a grinder. We need a straight hex key.
- Replace the original crank with the hex key, mounted with the shaft coupler.
- Position the L-bracket with the motor at the end of the hex key and mark the final position with a pen.
- Screw the L-bracket to the desk using a drill (slow speed)
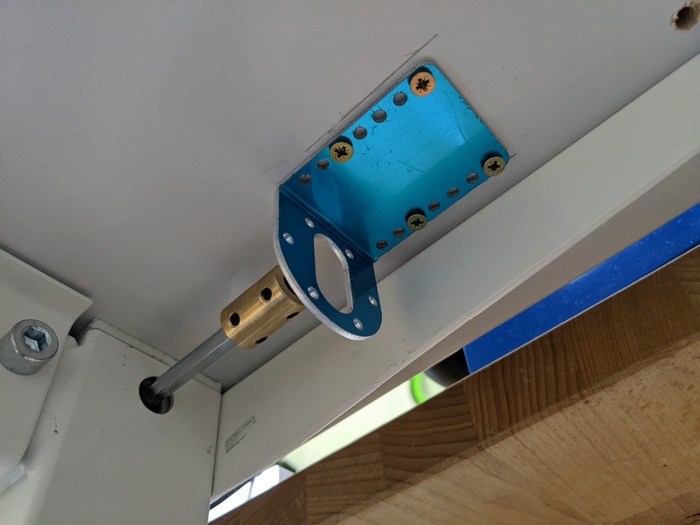
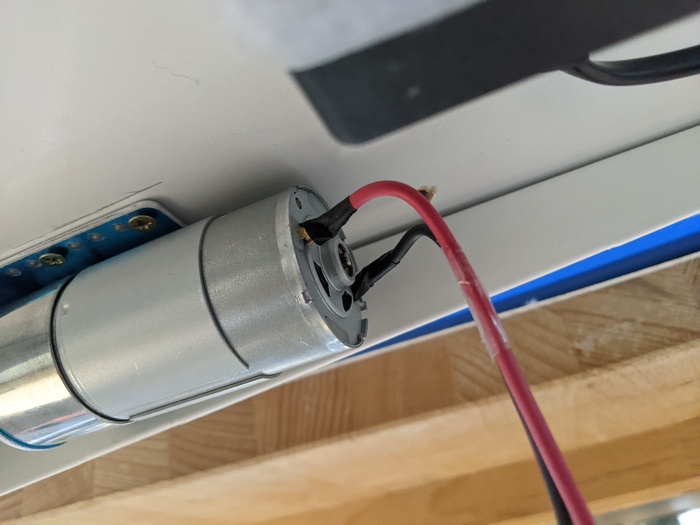
- Secure the motor to the L-bracket
- Attach the power supply to the desk with a self-adhesive velcro, or just tape:

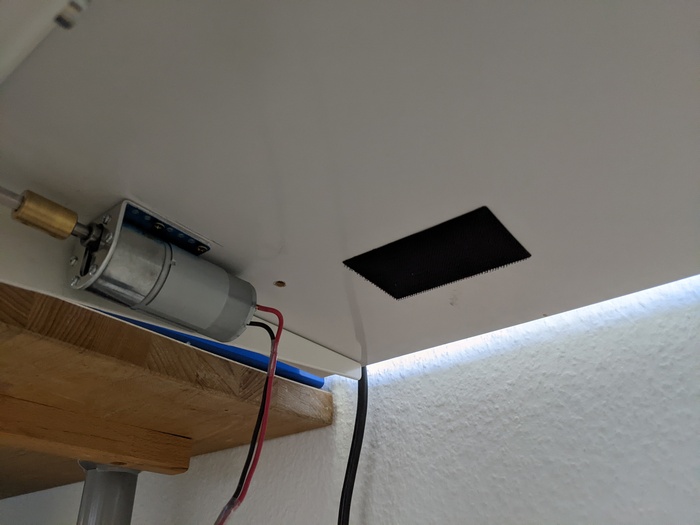
- Connect the motor to the DC motor driver using wires, and tape the junctions for improved safety
- Connect the power supply to the DC motor driver (pay attention to polarity) using the barrel and wrap it in tape for improved safety
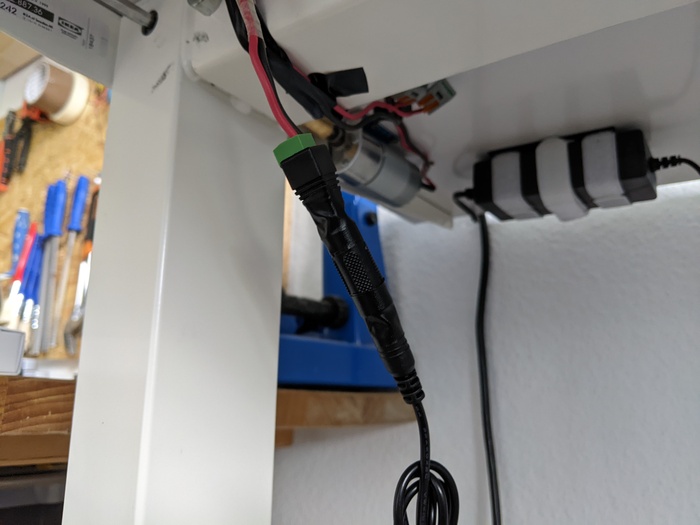
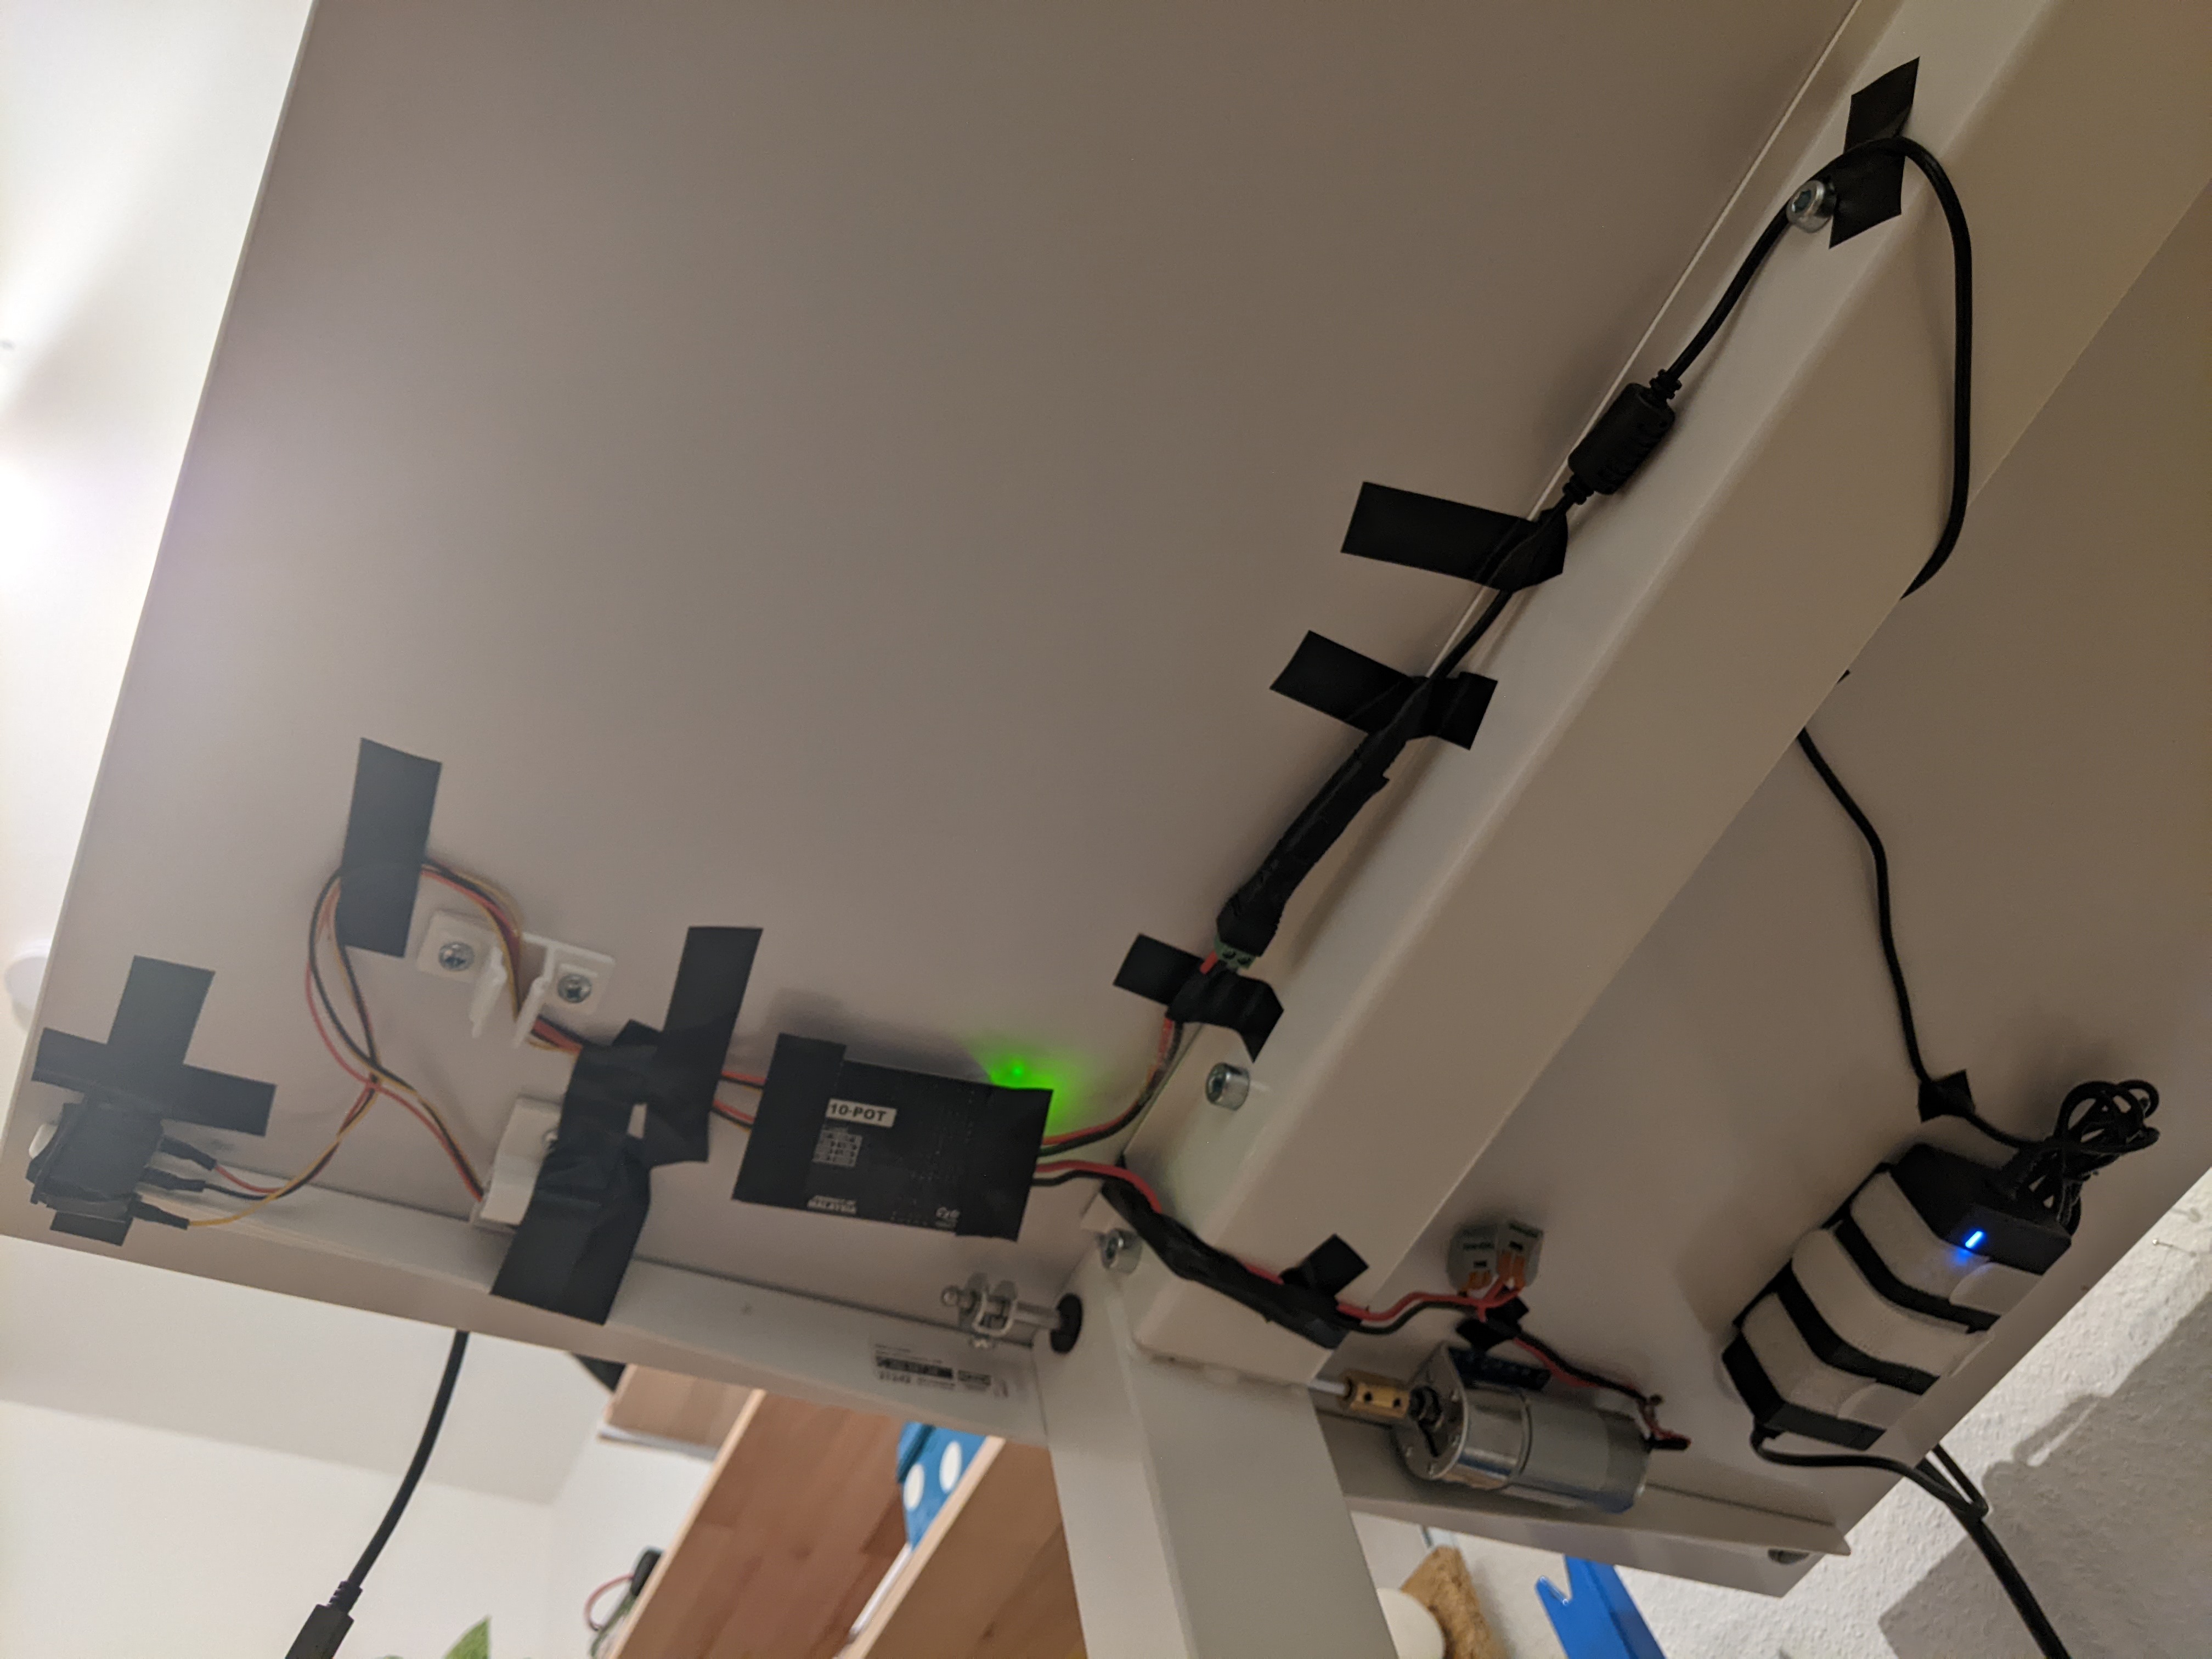
- And last, tape everything under the desk, make sure nothing is hanging. I protected some parts (soldered points) of the motor driver board with tape. I placed the switch button near the edge of the desk to reach it easily. A better design would be to put everything in a small plastic box.
A V2 of my project would be...
With a different motor driver, that has "Over Current" and "Under Voltage" protections, such as the MD13S from Cytron. Also with an Arduino and auto-raise feature based on how long it takes to raise/lower it. I don't need to have multiple programmable positions, nor an OLED screen. An auto-raise/lower feature can be tricky, for the following reasons (copy/pasted from https://github.com/cesar-moya/arduino-power-desktop/blob/master/MotorControl/MotorControl.ino):
If you activate auto-raise, and your desk was already at the maximum height, then - depending on your desk - on the IKEA SKARSTA it will hit a stopping point and the MOTORS WILL STALL for the amount of seconds that you recorded. In other words, if you recorded 30 seconds to raise, and your desk is already at the top position (or close), and you still enable auto-raise, you risk damaging your motors as a full power will be sent to them but they will be blocked. When using auto-raise and auto-lower you must ALWAYS be present and watching the desk, ready to cancel the operation if the motors stall for any reason.
And finally, a nicer design, where everything is not taped underneath but put in a plastic box.
Upgrade 2024: version 2!
To upgrade the desk, I wanted to make it smarter. I was tired of having to manually stop the desk at the desired height. I wanted to simply press a button, and it would raise/lower itself to the desired pre-defined position automatically, alone, while I'd be gone pooring myself some coffee 😁.
To achieve this, I decided to implement the following logic:
- Hardcode the maximum and minimum desired height in the code, based on my very own height and chair 😄. The current desk height could be measured with a sensor.
- BUT, if anything was in the way of the sensor (like a foot!), the measures would be off. To prevent the desk from raising too high for instance, I needed another safeguard: a maximum run time (time during which the motor is either raising or lowering the desk). Actually two values, cause the motor is quicker at lowering the desk than raising it.
For this V2, we're gonna reuse most of the what we used for the V1, but we'll also need additionally:
- Arduino Uno R4 Minima - 19.9 euros
- 2 push buttons - 7.99 euros for 7 buttons: one to raise the desk, one to lower it
- 2 10K-Ohm resistors - 0.05 euros each, for the buttons (despite the Arduino having an internal pullup resistor that can be used, it's not reliable enough). Prefer metal film over carbon, supposedly they're more robust.
- Pololu TB6612FNG motor driver - 4.20 euros
- HC-SR04 distance sensor - 1.49 euros
- A 200*120*55mm junction box - 12.34 euros
- 2.54mm screw terminal blocks / screwshield - 7.59 euros
-
Tape and wires:
- male-female: 4.49 euros
- male-male: 4.49 euros
- female-female: 4.49 euros
- 2-male-to-1-female: 11.98 euros
No need for a buck converter, we'll plug the Arduino Uno R4 minima directly to the 12V power supply through its VIN pin, which accepts voltage ranging from 6 to 24V. See why just below.
A few words on the motor driver
A lot of online tutorials recommend using the classic L298N for Arduino projects. Hower, a lot of people report issues with it on the Arduino forum. A common reply is that the L298N motor driver is old and obsolete, one of its flaws is the 5V drop. People often suggest using modern motor drivers from Pololu, and the TB6612FNG seemed like a good affordable option, even if it supports 2 motors and I'm only using it for one.
To set up the TB6612FNG, I followed this tutorial. Like in the tutorial, I initially wanted to power the Arduino through the 5V output pin of the motor driver (VCC), which would be powered directly by the 12V power supply, but I could not get this to work. Measuring voltage between the GRD and VCC pins of the motor driver never showed anything beyond 3V. So I plugged the Arduino directly on the power supply, through its VIN and GND pins.
Arduino IDE
For the Arduino IDE to work on a desktop Linux distro with a R4 Minima board, I had to write:
SUBSYSTEMS=="usb", ATTRS{idVendor}=="2341", ATTRS{idProduct}=="0069", GROUP="plugdev", MODE="0666"
SUBSYSTEMS=="usb", ATTRS{idVendor}=="2341", ATTRS{idProduct}=="0369", GROUP="plugdev", MODE="0666"
in /etc/udev/rules.d/99-arduino-uno-r4.rules. Then sudo udevadm control --reload-rules && sudo udevadm trigger.
Soldering
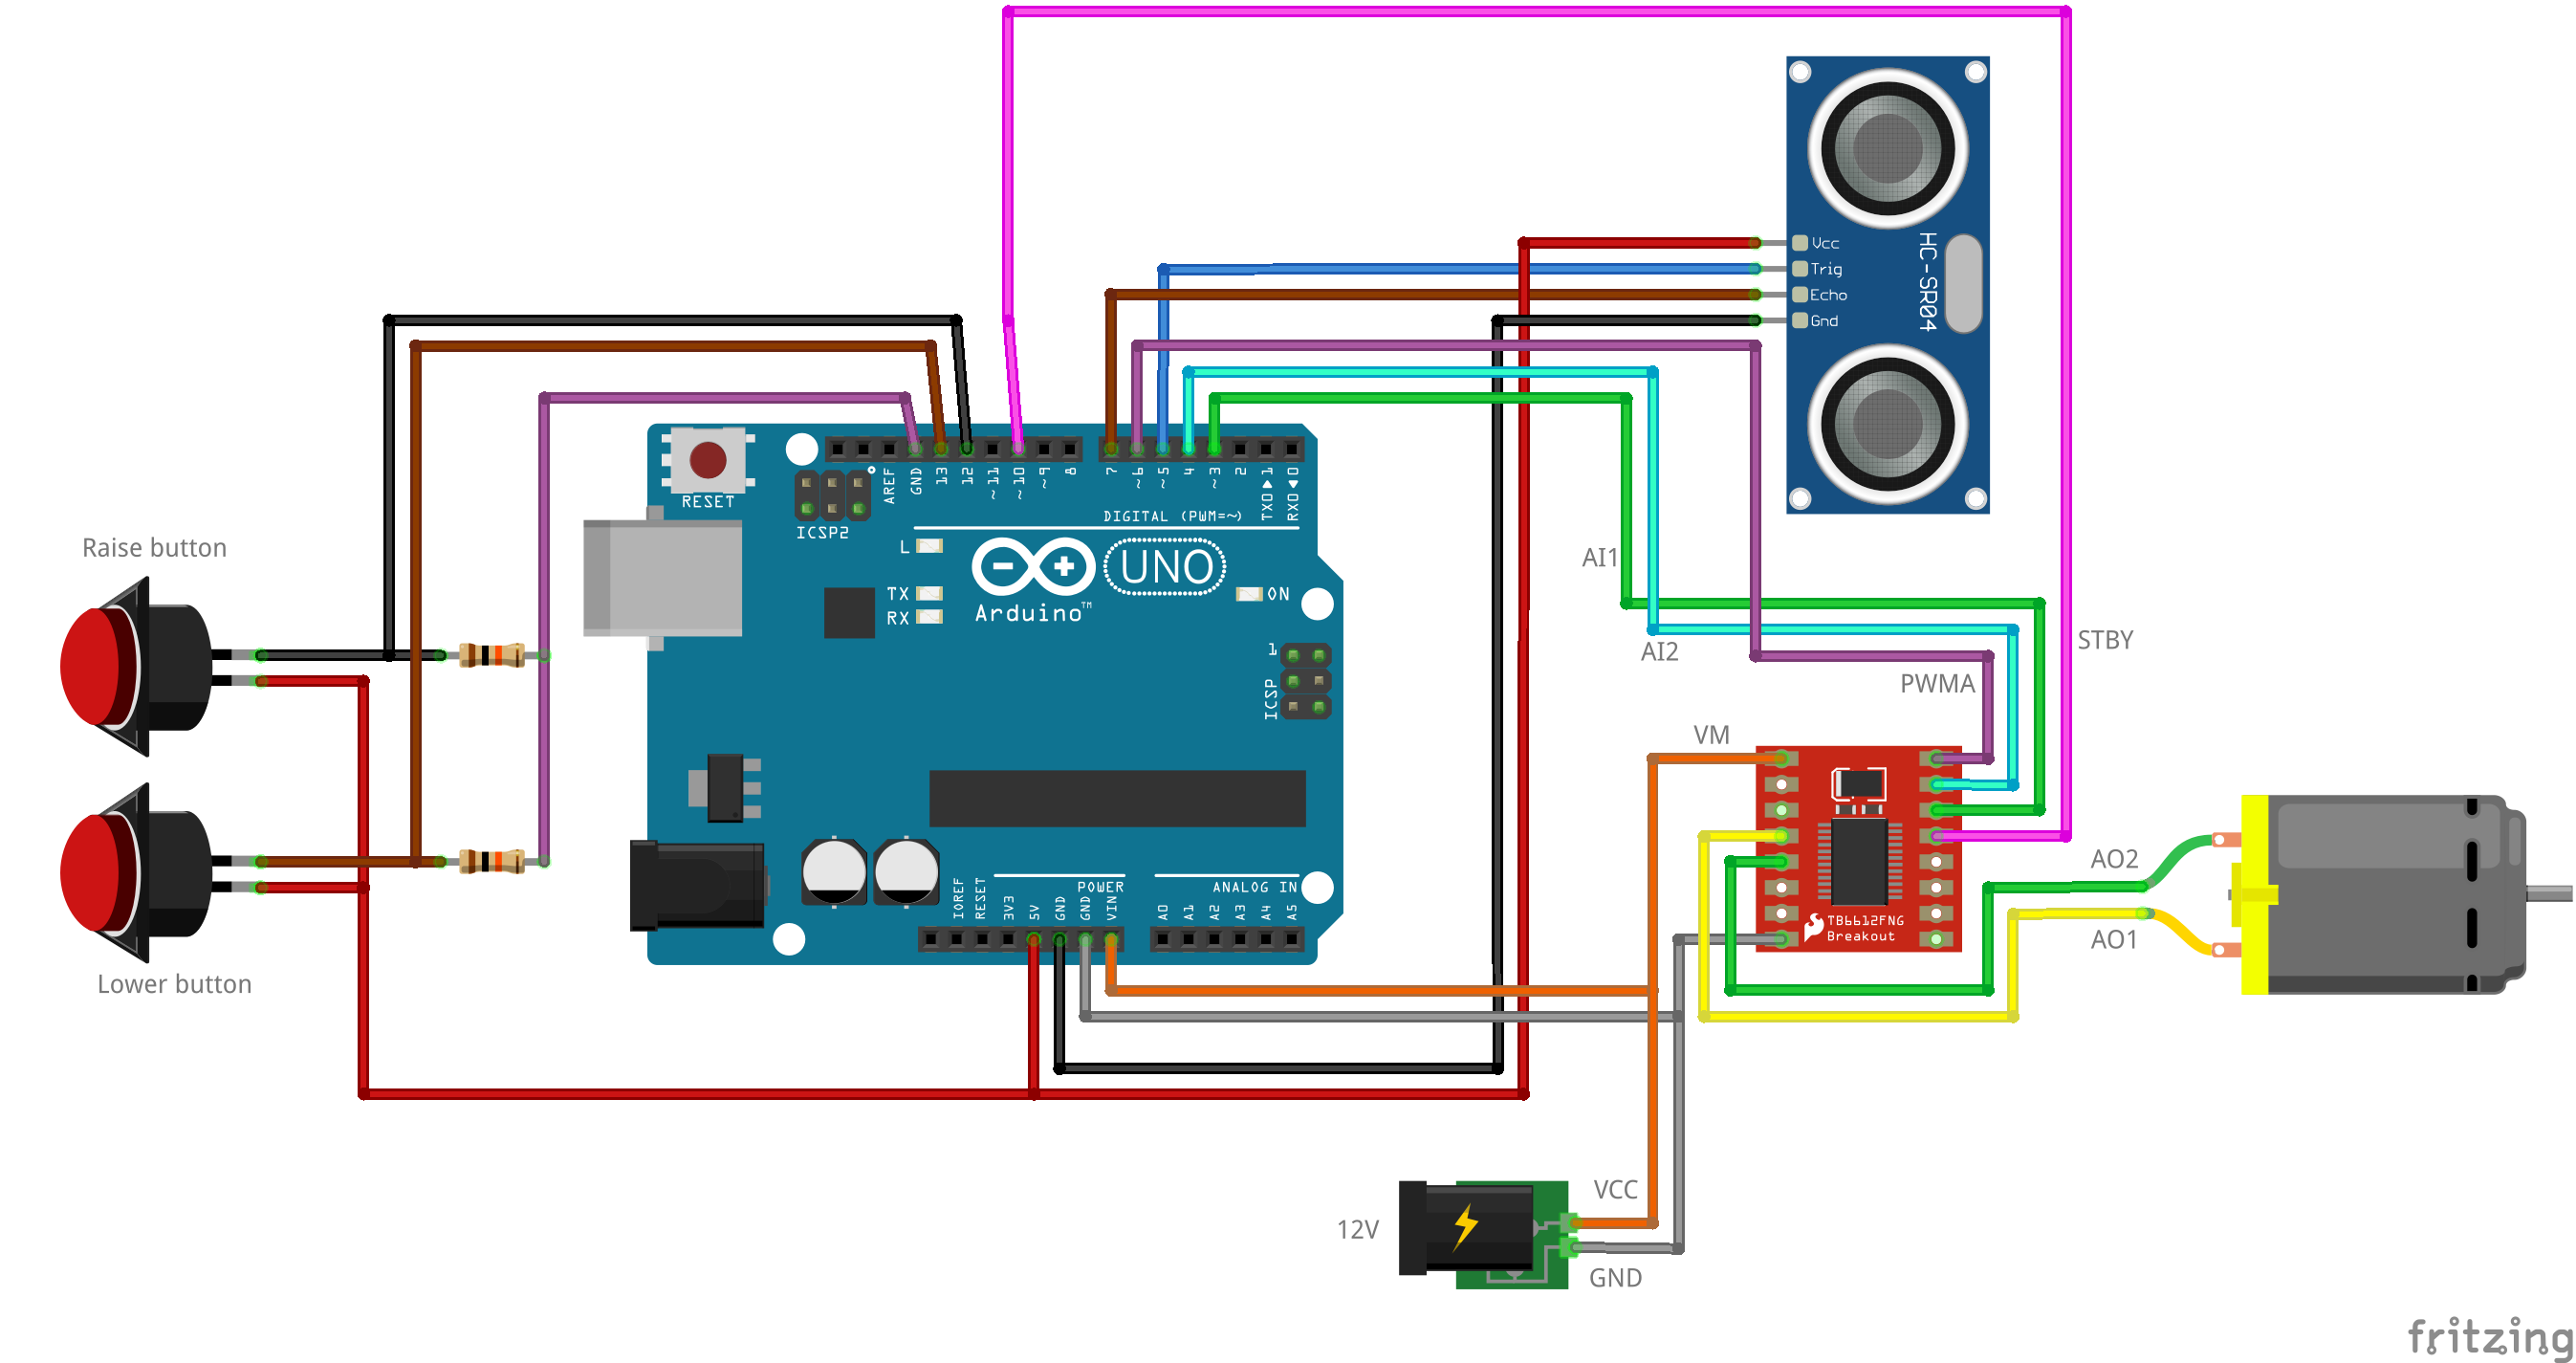
As you can see further below in the schematic, a bit of soldering is required, specifically if you want to avoid using a breadboard, when connecting 3 wires together, for instance.
Schematic and photos
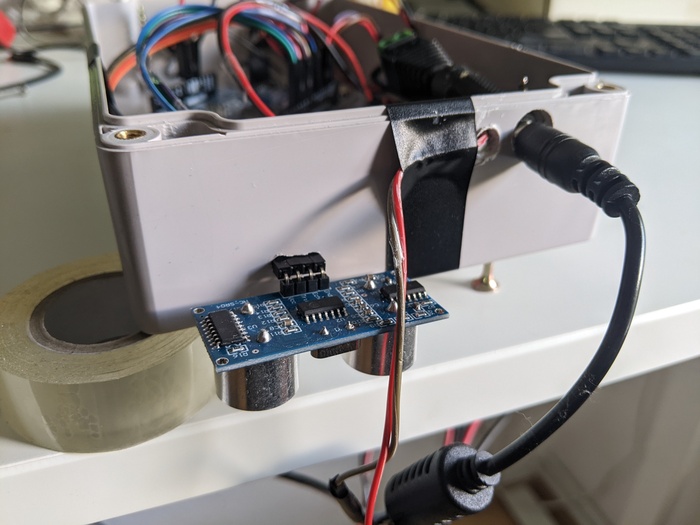
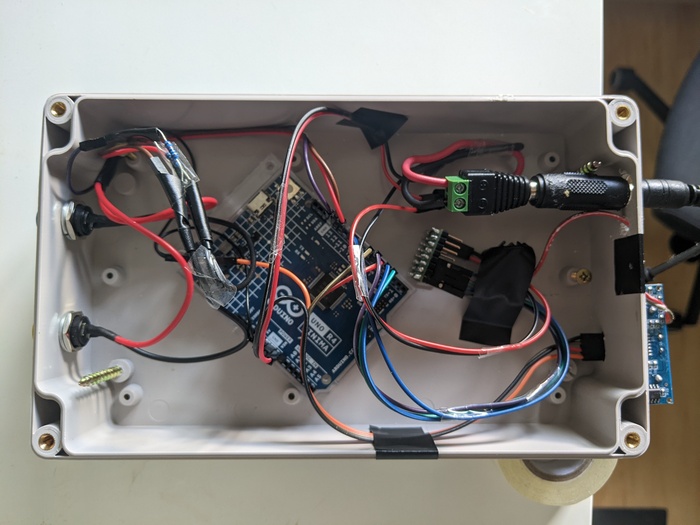
The box is attached to the desk with 2 screws, that can be seen in the photo above, sticking out in the box. The screws are directly screwed in the desk.
Code
Now, here's the Arduino code:
// Distance sensor pins
#define TRIGGER_PIN 5
#define ECHO_PIN 7

// Motor driver pins
#define STBY_PIN 10
#define AIN1_PIN 3
#define AIN2_PIN 4
#define PWMA_PIN 6

// Buttons
#define LOWER_DESK_BUTTON 13
#define RAISE_DESK_BUTTON 12

// Moving states
#define LOWER_DIRECTION 0
#define RAISE_DIRECTION 1
#define IDLE -1

// Settings
#define MIN_HEIGHT 66.4
#define MAX_HEIGHT 106.0
#define LOWER_TIME_OUT_AFTER_MS 43000
#define RAISE_TIME_OUT_AFTER_MS 63000
#define LOOP_DELAY 100
#define IGNORE_DELTA_IN_CM_GREATHER_THAN 1.5

// Distance sensor variables
long duration;
float deltaWithLastKnownCm ,cm, lastKnownCm;

// Moving state variables
int movingDirection = IDLE;
int movingStartedAt = 0; // in milliseconds

float readHeight() {
  // The sensor is triggered by a HIGH pulse of 10 or more microseconds.
  // Give a short LOW pulse beforehand to ensure a clean HIGH pulse:
  digitalWrite(TRIGGER_PIN, LOW);
  delayMicroseconds(5);
  digitalWrite(TRIGGER_PIN, HIGH);
  delayMicroseconds(10);
  digitalWrite(TRIGGER_PIN, LOW);

  // Read the signal from the sensor: a HIGH pulse whose
  // duration is the time (in microseconds) from the sending
  // of the ping to the reception of its echo off of an object.
  pinMode(ECHO_PIN, INPUT);
  duration = pulseIn(ECHO_PIN, HIGH);

  return (float)(duration / 2) * 0.0343; // Convert the time into a distance
}

void setup() {
  Serial.begin(9600); // Enable logs

  // Distance sensor
  pinMode(TRIGGER_PIN, OUTPUT);
  pinMode(ECHO_PIN, INPUT);

  // Buttons
  pinMode(LOWER_DESK_BUTTON, INPUT);
  pinMode(RAISE_DESK_BUTTON, INPUT);

  // Motor
  pinMode(STBY_PIN, OUTPUT);
  pinMode(PWMA_PIN, OUTPUT);
  pinMode(AIN1_PIN, OUTPUT);
  pinMode(AIN2_PIN, OUTPUT);

  // while (!Serial); // While the serial stream is not open, do nothing. FOR DEBUGGING ONLY, when the logs from line 73 are needed.
  lastKnownCm = readHeight();
  // Serial.println("SETUP!!! Height: " + String(cm) + " cm; Lastknowncm: " + lastKnownCm + " cm");
  delay(LOOP_DELAY); // Needed, otherwise the very next reading of height won't work, we'd have to wait the second call to loop()...
}

void loop() {
  cm = readHeight();
  deltaWithLastKnownCm = abs(cm - lastKnownCm); // Sometimes we get odd random readings, wildly different from the previous one. We must ignore those.
  Serial.println((String) "Height: " + cm + " cm; Delta with last reading: " + deltaWithLastKnownCm + " cm");
  lastKnownCm = cm;

  boolean isMoving = movingDirection != IDLE;

  if (isMoving) {
    movingStartedAt = movingStartedAt + LOOP_DELAY;
    Serial.println("Moving time: " + String(movingStartedAt / 1000) + " seconds");
    if (movingDirection == RAISE_DIRECTION) {
      if (cm >= MAX_HEIGHT && deltaWithLastKnownCm < IGNORE_DELTA_IN_CM_GREATHER_THAN) {
        Serial.println("Too high!");
        return stop();
      }
      if (movingStartedAt > RAISE_TIME_OUT_AFTER_MS) {
        Serial.println("Raise timed out!");
        return stop();
      }
    }
    if (movingDirection == LOWER_DIRECTION) {
      if (cm <= MIN_HEIGHT && deltaWithLastKnownCm < IGNORE_DELTA_IN_CM_GREATHER_THAN) {
        Serial.println("Too low!");
        return stop();
      }
      if (movingStartedAt > LOWER_TIME_OUT_AFTER_MS) {
        Serial.println("Lower timed out!");
        return stop();
      }
    }
  }

  if (digitalRead(LOWER_DESK_BUTTON) == HIGH) {
      Serial.println("Lower Button is pressed");
      if (isMoving) {
        return stop();
      }

      while(digitalRead(LOWER_DESK_BUTTON) == HIGH) {
        // Do nothing and wait till the button is released
        delay(20);
      }
      move(255, LOWER_DIRECTION);
      delay(LOOP_DELAY * 2); // Delaying a bit more, to allow the desk to keep lowering slightly even if min height was reached
  }
  else if (digitalRead(RAISE_DESK_BUTTON) == HIGH) {
      Serial.println("Raise Button is pressed");
      if (isMoving) {
        return stop();
      }

      while(digitalRead(RAISE_DESK_BUTTON) == HIGH) {
        // Do nothing and wait till the button is released
        delay(20);
      }
      move(255, RAISE_DIRECTION);
      delay(LOOP_DELAY * 2); // Delaying a bit more, to allow the desk to keep raising slightly even if max height was reached
  }

  delay(LOOP_DELAY);
}

void move(int speed, int direction){
  Serial.println("move() called");
  movingDirection = direction;

  boolean inPin1 = LOW;
  boolean inPin2 = HIGH;

  if(direction == LOWER_DIRECTION){
    inPin1 = HIGH;
    inPin2 = LOW;
  }

  digitalWrite(AIN1_PIN, inPin1);
  digitalWrite(AIN2_PIN, inPin2);
  digitalWrite(STBY_PIN, HIGH); // disable standby, powering the motor driver
  analogWrite(PWMA_PIN, 255); // 255 is full speed
}

void stop(){
  Serial.println("stop() called");
  movingStartedAt = 0;
  movingDirection = IDLE;
  digitalWrite(STBY_PIN, LOW);
  delay(1500); // Waiting a bit, so that a long press of a button won't stop and move it again immediately
}
Result: the V2 in action!
Other tutorials
- http://cesarmoya.com/blog/motorizing-standup-desk/: says 2Nm is needed for torque
- https://github.com/aenniw/ARDUINO/tree/master/skarsta
- https://github.com/flosommerfeld/ESP8266-IKEA-Skarsta-Trotten-Web-Dashboard
- https://www.instructables.com/Motorizing-an-IKEA-SKARSTA-Table/: they use an optional endstop to count how many rotations the motor does, thanks to some flag put on the shaft
- https://hackcorrelation.blogspot.com/2015/09/ikea-skarsta-sitstanding-desk-hack.html: says 2Nm is needed for torque